Once upon a time, PowerPoint 2013 had but rudimentary drawing tools — the equivalent of a box of crayons — but PowerPoint now has powerful drawing tools that are sufficient for all but the most sophisticated aspiring artists. Here are a handful of general tips for drawing pictures in PowerPoint 2013.
Zoom in for drawing in PowerPoint
When you work with the PowerPoint drawing tools, you might want to increase the zoom factor so that you can draw more accurately. To change the zoom factor, use the zoom slider located in the bottom-right corner of the screen.
Before you change the zoom factor to edit an object, select the object that you want to edit. This way, PowerPoint zooms in on that area of the slide. If you don’t select an object before you zoom in, you might need to scroll around to find the right location.
Display the ruler, gridlines, and guides in PowerPoint drawings
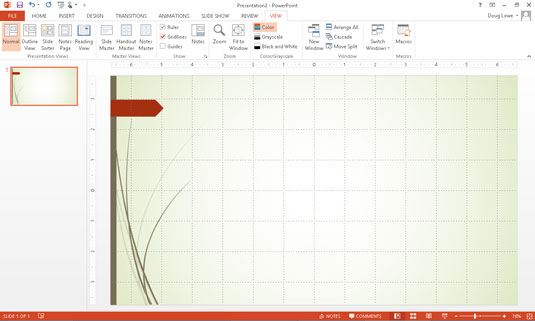
PowerPoint provides three onscreen features that can help you line up your drawings:
Ruler: Horizontal and vertical rulers appear at the top of and to the left of the slide.
Gridlines: A grid of evenly spaced dots appears directly on the slide.
Guides: A pair of horizontal and vertical lines intersect on your slide like crosshairs in a target.
You can activate any or all of these features by clicking the View tab on the Ribbon and selecting the Ruler, Gridlines, or Guides check box. The figure shows PowerPoint with the rulers, gridlines, and guides displayed.

When you work with drawing objects, the ruler is positioned so that zero is at the middle of the slide. When you edit a text object, the ruler changes to a text ruler that measures from the margins and indicates tab positions.
Stick to the color scheme when drawing in PowerPoint
You can assign individual colors to each object that you draw, but the purpose of the PowerPoint color schemes is to talk you out of doing that. If possible, let solid objects default to the color scheme’s fill color, or, if you must change the fill color, change it to one of the alternative colors provided by the scheme.
The beauty of doing this is that if you change the color scheme later, the fill color for objects changes to reflect the new fill color. After you switch to a color that’s not in the theme, however, the object ignores any subsequent changes to the theme.
Saving frequently when drawing in PowerPoint
Drawing is tedious work. You don’t want to spend two hours working on a particularly important drawing only to lose it all just because a comet strikes your building or an errant Scud lands in your backyard. You can prevent catastrophic loss from incidents such as these by pressing Ctrl+S or by frequently clicking the Save button as you work. And always wear protective eyewear.
Remember Ctrl+Z to undo drawing mistakes
Ctrl+Z — the ubiquitous Undo command — is the most important keyboard shortcut in any Windows program, and PowerPoint is no exception. Remember that you’re never more than one keystroke away from erasing a boo-boo.
If you do something silly — like forgetting to group a complex picture before trying to move it — you can always press Ctrl+Z to undo your last action. Ctrl+Z is my favorite and most frequently used PowerPoint key combination. (For left-handed mouse users, Alt+Backspace does the same thing.) And if you aren’t ready to climb on a chair shrieking at the first sign of a mouse, try clicking the handy Undo button on the Quick Access Toolbar.


