Approval workflow is one of several workflow templates in SharePoint 2010. By default, Content Approval is enabled on publishing portals. This can be confusing because when Content Approval is enabled, a document doesn’t become visible to others until it’s published.
To determine whether Publishing workflow is enabled on your library, open the document library and click the Properties icon for any document. If Workflows is an option, you’re all set.
To set an approval workflow, first access the Library Settings page using the Ribbon in your library.
In the Permissions and Management settings options, click the Workflow Settings link.

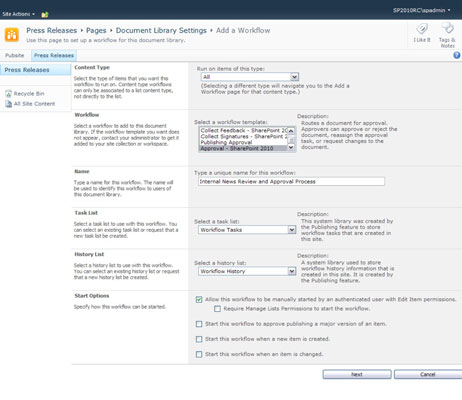
The Add a Workflow page is displayed. Click the Approval – SharePoint 2010 template option in the Select a Workflow Template list.
Enter a name in the Type a Unique Name for This Workflow text box.
Choose a name that describes the step in your business process this workflow fulfills. Most business processes can have several approval steps, so calling it The Approval Workflow isn’t meaningful.
For example, if your approval workflow is actually a review workflow, call it the Author Review Workflow. If you need to add a second approval workflow, you could call it the Regulatory Editorial Review Workflow.
Use the Select a Task List drop-down list to choose a task list.
Go with the default — Workflow Tasks — unless you have a special reason for wanting to track this workflow in a list by itself.
Use the Select a History List drop-down list to choose a history list.
Again, accept the default, which is Workflow History.
Select a Start option by selecting the appropriate check box.
Decide how you want the workflow to be triggered. If you want the workflow to start manually, select the check box Allow This Workflow to Be Manually Started by an Authenticated User with Edit Item Permissions.
Note: You can have only one workflow that’s triggered by publishing in a library.
Click the Next button.

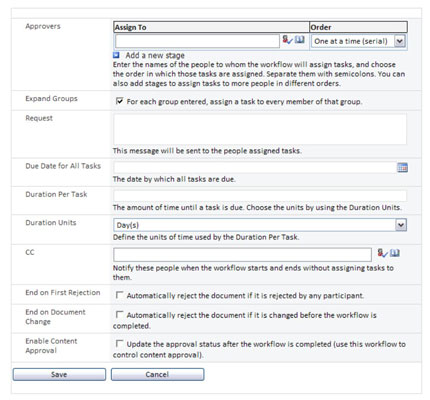
The Page Approval page appears.
Specify the appropriate options.
Click the Save button.
If you have an alert enabled on a library/list, and approval is also turned on for that library/list, you may not receive a notification until a new or changed item is approved and published.
If you just need approvals, the Approval workflow may be overkill. Consider turning off workflow and just keeping approvals, with or without versioning. Items that require approval will quietly sit there waiting for someone to take notice.


