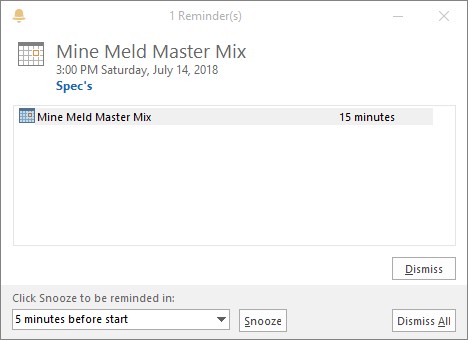
The image below shows the Reminder message box. When Outlook is running and you least expect it, a Reminder message box may appear to keep you on your toes. These pages explain how to handle reminder messages, schedule messages, and make the messages appear when you want them to appear.
 The Outlook Reminder message box.
Handling reminder messages
Select a reminder in the Reminder message box and do the following to handle an Outlook reminder:- Dismiss it: Click the Dismiss button to shelve the reminder notice. If more than one notice appears in the Reminder message box and you want to erase them all, click the Dismiss All button.
- Be reminded later: Click the Snooze button. At the bottom of the dialog box, the Click Snooze to Be Reminded Again In text box tells you when the next reminder message will arrive. To change this setting, open the drop-down list and choose a different time period.
- Open the item: Double-click the reminder to examine the appointment, task, email message, or contact to which the reminder pertains.
- Procrastinate: Click the Close button (the X) in the Reminder message box to make it disappear. To open the message box later, go to the View tab and click the Reminders Window button.
Outlook reminders work only for items that are stored in these folders: Tasks, Calendar, Inbox, and Contacts. Store an item in another folder or a subfolder of one of the folders listed above, and you won’t see the Reminder message box when the reminder is due. To make sure you get reminded, store items in these folders: Tasks, Calendar, Inbox, or Contacts.
Scheduling a reminder message
Follow these instructions to schedule a reminder message in Outlook 2019:- Calendar appointment or event: In the Appointment window, open the Reminder drop-down list and choose how many minutes, hours, or weeks in advance of the appointment or event to make the reminder appear.
- Task deadline: In the Outlook Task window, select the Reminder check box and choose a day and time to be reminded in the drop-down menus.
- Contacts name: In a Contact window or the Contacts window, click the Follow Up button and choose Add Reminder on the drop-down list. The Custom dialog box opens. Treat this dialog box the same way you treat the one for email messages (see the preceding item in this list).
Making reminders work your way
You can do two or three things to make reminders work your way. On Outlook’s File tab, choose Options to open the Options dialog box. Then follow these instructions to have your way with Outlook reminder notices:- Changing the reminder time for appointments and events: By default, the Reminder message box appears 15 minutes before appointments and events start. To change this setting, go to the Calendar category and enter a new setting in the Default Reminders drop-down list (look under “Calendar Options”).
- Changing the default time for task reminders: When a task’s deadline arrives, the Outlook Reminders dialog box lets you know at 8:00 a.m. (or when you start Outlook, if you start the program after 8:00 a.m.). To change this default setting, go to the Tasks category and choose a new time from the Default Reminder Time drop-down list.
- Playing a different sound (or no sound): By default, you hear a little chime when the Outlook Reminder message box appears onscreen. To hear a different sound or no sound at all, go to the Advanced category of the Options dialog box. To play no sound, deselect the Play Reminder Sound check box. To play a different sound, click the Browse button and then select a .wav sound file in the Reminder Sound File dialog box.


