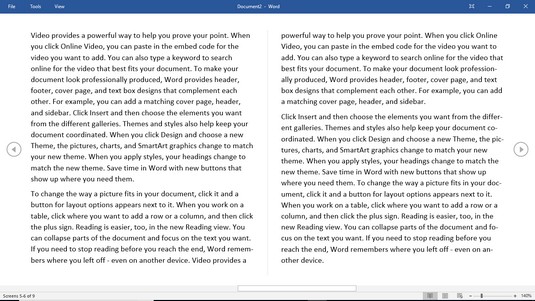
- Read Mode: Display pages that require you to slide them horizontally to view adjacent pages.
- Print Layout: Display page breaks as thick, dark horizontal bars so you can clearly see where a page ends and begins. (This is the default view.)
- Web Layout: Display your document exactly as it would appear if you saved it as a web page.
- Outline: Display your document as outline headings and subheadings.
- Draft: Display the document without top or bottom page margins and with page breaks as dotted lines.
Switching between views in Word 2019
Microsoft Word gives you two ways to switch between different document views:- Click the view icons in the bottom-right corner of your document window.
The only view icons in the bottom-right corner of the document window are Read Mode, Print Layout, and web Layout.
- Click the View tab and then click the view you want to use, such as Print Layout or Draft view.
Using Read Mode view in Word 2019
Read Mode can be handy for making text easier to read just the way you’d see it a book. To turn the pages of a document displayed in Read Mode view, click the Previous Screen or Next Screen icon on the left and right edge of the screen, respectively. Read Mode view lets you read a document in the form of an open book.
To exit Read Mode view, choose one of the following:
- Press Esc.
- Click the Print Layout or web Layout icon in the bottom-right corner of the screen.
Using Outline view in Word 2019
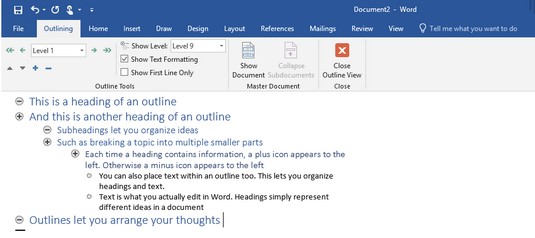
Outline view divides a document into sections defined by headings and text. A heading represents a main idea. Text contains one or more paragraphs that are “attached” to a particular heading. A subheading lets you divide a main idea (heading) into multiple parts. A typical outline might look like this. A typical outline consists of headings, subheadings, and text that you can expand or collapse to hide subheadings or text.
Within Outline view you can do the following:
- Collapse headings to hide parts (subheadings and text) temporarily from view.
- Rearrange headings to move subheadings and text easily within a large document.
To switch to Outline view, click the View tab and then click the Outline icon.
Defining a heading in Word 2019
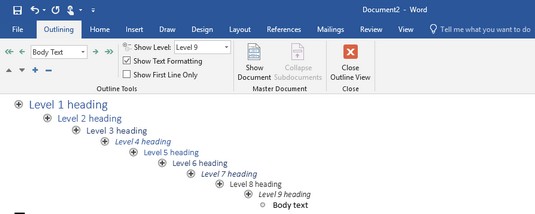
Outline view considers each line as either a heading or text. To define a line as either a heading style (Level 1 to Level 9) or text, make sure you have switched to Outline view in Word and then follow these steps:- Move the cursor to the line that you want to define as a heading or text.
- Click in the Outline Level list box and choose a heading level, such as Level 2.
 The nine heading levels available.
To create a heading quickly, move the cursor to the end of an existing heading and press Enter to create an identical heading. For example, if you put the cursor at the end of a Level 3 heading and press Enter, Word creates a new blank Level 3 heading.
Promoting and demoting a heading in Word 2019
After you define a heading (such as a Level 1 or Level 3 heading), you can always change its level, such as changing a Level 1 heading to a Level 2 heading or vice versa:- When you raise a heading from one level to another (such as from Level 3 to Level 2), that’s promoting.
- When you lower a heading (such as from Level 4 to Level 5), that’s demoting.
To promote or demote a heading to a different level in Word, follow these steps:
- Using either the mouse or the keyboard, move the cursor to the heading you want to promote or demote.
- Choose one of the following methods:
- Click the Outline Level list box and then click a level (such as Level 2).
- Press Tab to demote the heading or Shift+Tab to promote the heading.
- Click the Promote or Demote arrow.
- Move the mouse pointer over the circle that appears to the left of the heading, hold down the left mouse button, drag the mouse right or left, and then release the left mouse button.
Promoting or demoting a heading automatically promotes or demotes any subheadings or text attached to the promoted or demoted heading. That way the subheadings or text maintain the same relationship to the heading.
Moving headings up and down in Word 2019
You can move headings up or down within a document. To move a heading, follow these steps:- Using either the mouse or the keyboard, move the cursor to the heading you want to promote or demote.
- Choose one of the following methods:
- Click the Move Up or Move Down arrow icons on the Outlining tab.
- Press Alt+Shift+↑or Alt+Shift+↓.
- Move the mouse pointer over the circle that appears to the left of the heading, hold down the left mouse button, drag the mouse up or down, and then release the left mouse button.
Creating text in Word’s View Modes
Text can consist of a single sentence, multiple sentences, or several paragraphs. Text always appears indented below a heading (or subheading). To create text in Word’s View modes, follow these steps:- Move the cursor to the end of a heading or subheading.This is the heading (or subheading) that your text will be attached to if you move the heading (or subheading).
- Press Enter.
Word creates a blank heading.
- Click Demote to Body Text icon (the double arrow pointing to the right) or click in the Outline Level list box and choose Body Text.Word displays a bullet point, indented below the heading you chose in Step 1.
- Type your text.
Collapsing and expanding headings and subheadings in Word’s Views
If a heading or subheading contains any subheadings or text below, you can collapse that heading. Collapsing a heading simply hides any indented subheadings or text from view temporarily. Expanding a heading displays any previously hidden subheadings or text.To collapse a heading along with all subheadings or body text below it, double-click the plus (+) icon that appears to the left of the heading.
If you just want to collapse the subheading or body text that appears below a heading in Word, choose one of the following:
- Move the cursor anywhere in the heading that you want to collapse, and then click the Collapse (minus sign) icon.
- Press Alt+Shift+ + (plus sign key).
If you just want to expand the subheading or body text immediately below a collapsed heading, choose one of the following:
- Move the cursor anywhere in the heading that you want to expand, and then click the Expand icon (a plus sign inside a circle).
- Press Alt+Shift+ – (minus sign key).


