In Word 2013, tables have an advantage over organizing information with rows and columns, courtesy of the Tab key. That’s because a table is considered its own document element, one that Word manipulates as a unit.
In a table, you can easily add, remove, or reorganize the rows and columns. You can format a table all at once, using predefined formatting options. While you could do all that with tabs, the process would undoubtedly drive you insane. You probably don’t want to go insane, so you should use Word’s Table command any time you need to present information in a grid of rows and columns.
Before you venture into Table Creation Land, you should peruse these points:
Anytime you need information in a grid, or in columns and rows, you're better off creating a table in Word than fussing with tabs and tab stops.
Rows in a table appear from left to right across the screen.
Columns in a table go up and down.
Each "cubbyhole" in a table is a cell.
Cells can have their own margins, text, and paragraph formats. You can even stick graphics into cells.
Unlike when you work with tabs, Word tables can be resized and rearranged to fit your data. Try doing that with tabs!
Word’s Table commands
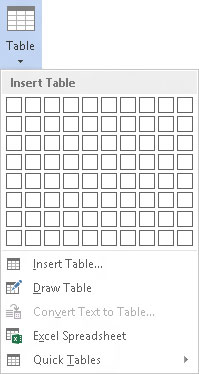
A table is something you insert into your document, so Word’s Table commands are found on the Ribbon’s Insert tab, in the aptly named Tables group. Only one button is in that group. Click that button to see the Table menu.

Insert the table into your document.
Word offers various table-creating commands, all of which plop down a nice, blank empty table for you to fill.
Add the table’s text.
Unlike at other times where it works best to first write your prose and then format it, you should create the table first and then fill it with text.
Format the table.
The job of formatting takes place by using two special tabs that appear on the Ribbon: Design and Layout. They both appear beneath the Table Tools label.
The formatting job also includes adding or removing rows or columns in the table. Again, it takes place after the table is initially created and after you add text.
Don’t fret if you’ve already started a table by using tabs and tab stops. Word deftly converts plain text into a table.
Word lets you easily add or remove rows or columns to or from a table. Don’t worry about getting the table dimensions wrong when you first create it.
The table is initially created at the same width as your document's paragraph margins. As you add more columns, each column gets smaller.
The two special tabs that appear on the Ribbon, Design and Layout, show up anytime the insertion pointer dwells in a table’s midst.
Many ways to make a table in Word 2013
Just to confuse you, Word offers multiple ways to create a table. It’s one of those let’s-deluge-the-user-with-options things that Microsoft does so well. Depending on how well you get along with Word, you can choose one of the various ways.
The best way to create a table
The most consistent way to make a table in Word is to use the grid on the Table button’s menu. Follow these steps:
Move the insertion pointer to the location where you want the table in your document.
Tables dwell in your document like paragraphs, existing on a line by themselves.
Click the Insert tab.
Click the Table button.
Drag the mouse through the grid to create in your document a table that has the number of rows and columns you need for the table.
As you drag the mouse pointer on the menu, the table's grid appears in your document.

Release the mouse button to begin working on the table.
The right-brain approach to creating a table
When dialog boxes make more sense than using menus and graphical goobers, choose the Insert Table command from the Table menu. Use the Insert Table dialog box to manually enter the number of rows and columns you need. Click the OK button to plop down your table.
The completely left-brain approach to creating a table
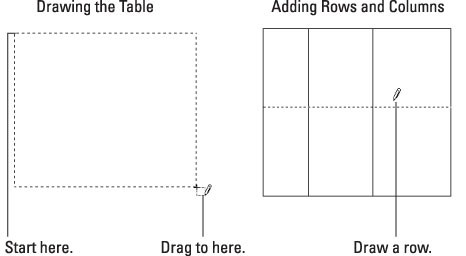
Free your mind from the constraints of conventionalism, clutch a crystal, and use the mouse to draw a table inside your document: From the Table menu on the Insert tab, choose Draw Table. The insertion pointer changes to a pencil, as shown in the margin. Drag the mouse to “draw” the table’s outline in your document.

Start in the upper-left corner of where you envision your table and drag to the lower-right corner, which tells Word where to insert the table. You see an outline of the table as you drag down and to the right.
Continue to create the table by drawing rows and columns. As long as the mouse pointer looks like a pencil, you can use it to draw the rows and columns in your table.
Press the Esc key to end table-creation mode.
The “I can’t do anything — please help” approach to creating a table
Word comes with an assortment of predefined, formatted tables. Plopping one down in your document is as easy as using the Quick Tables submenu, chosen from the Table menu on the Insert tab. Keep scrolling that menu; you’ll discover more tables available than just the calendars.
After inserting a Quick Table, all you need to do is add or edit the existing text. You can even use the Table Tools Design tab to instantly reformat the table. Or just succumb to the desire to manually format your table.


