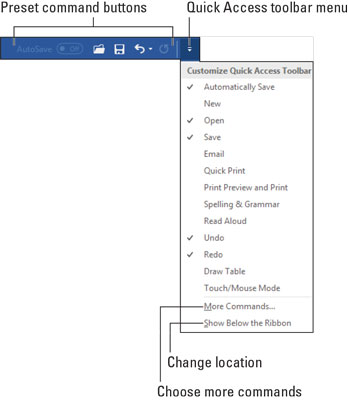
The Quick Access toolbar is illustrated here. It’s found in the upper left corner of the window.
 The Quick Access toolbar.
Click a wee icon on the Quick Access toolbar to activate a feature. You can customize the toolbar by removing icons you don’t use and adding icons you do.
- When the Quick Access toolbar grows too many custom buttons and it begins to crowd into the document’s title, place it below the Ribbon: Choose the Show Below the Ribbon command from the toolbar menu. To move the Quick Access toolbar back atop the Ribbon, choose the Show Above the Ribbon command.
- Word is configured to show several buttons on the Quick Access toolbar: AutoSave (for documents saved to OneDrive), Open, Save, Undo, and Redo. If you have a touchscreen PC, another button appears, Touch/Mouse Mode.
Adding buttons to the Quick Access toolbar in Microsoft Word
When you enjoy using a Word command so much that you see the command button icon when you close your eyes, consider adding the command to the Quick Access toolbar.To quickly add a common command to the Quick Access tollbar, click the menu button as illustrated. Choose a command from the menu to add it to the Quick Access toolbar.
For other commands, those that don’t appear on the Quick Access toolbar menu, locate the command button on the Ribbon. Right-click the command button and choose Add to Quick Access toolbar from the shortcut menu that pops up.
- Word remembers the Quick Action toolbar’s commands. They show up again the next time you start Word, in every document window.
- Some commands place buttons on the toolbar, and others place drop-down menus or text boxes.
Editing the Quick Access toolbar in Microsoft Word
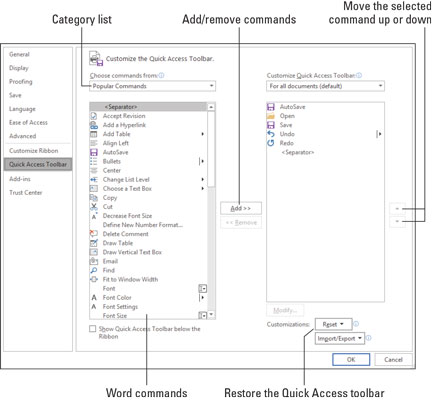
If your adoration of the Quick Access toolbar turns into an obsession, you can go hog-wild modifying the thing: Choose More Commands from the Quick Access toolbar’s menu. You see the Word Options dialog box with the Quick Access Toolbar area shown, as illustrated. Adjusting the Quick Access toolbar.
Use the list on the left to choose a new command to add to the Quick Access toolbar.
The list on the right shows items currently on the toolbar. Use the up or down buttons to move items up or down (left or right) on the Quick Access toolbar.
Click the OK button when you finish editing.
- Choose the All Commands item from the Choose Commands From menu (refer to Figure 29-3) to view every possible command in Word. Sometimes, a missing command that you think could be elsewhere ends up being available in the All Commands list — for example, the once-popular Save All command or the Tabs command, which quickly displays the Tabs dialog box.
- When the command list grows long, consider organizing it. Use the
item to help group similar commands. This item appears as a vertical bar on the Quick Access toolbar. - Yes, some commands lack specific graphics on their buttons; they show up as large dots on the toolbar.
- To return the Quick Access toolbar to the way Word originally had it, choose Reset → Reset Only Quick Access toolbar from the Word Options window. (Refer to the lower right corner in the figure.)
Removing items from the Quick Access toolbar
To remove a command from the Quick Access toolbar, right-click its command button and choose Remove from Quick Access toolbar.Likewise, you can choose a command with a check mark from the Customize Quick Access Toolbar menu. Or you can use the Word Options dialog box to remove items.


