How to add a comment in Microsoft Word
To adroitly thrust a comment into a document, follow these steps:- Select the chunk of text upon which you desire to comment. Be specific. You may be tempted to select an entire phrase, but only the first few words are necessary.
- Click the Review tab.
- In the Comments group, click the New Comment button.
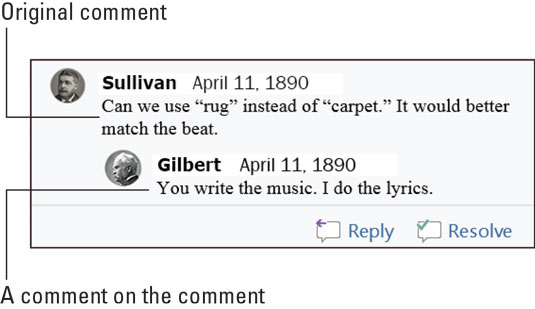
 The New Comment button is shown here. Click it to see the Comments box appear to the right of the current page, similar to what’s shown in the following figure. The side of the page where the comment appears is called the markup area.
 - Type a comment. Jot down your thoughts. I’m not sure how long a comment can be; if you want to blab, send an email instead. For some reason, text formatting can be applied to the comment.
- Press the Esc key when you’ve finished typing the comment. Or you can click in the document’s text.
 Comments on a text passage.
How to reply to a comment in Microsoft Word
Comments aren’t intended to hang in space — unless you just want to ignore them. Otherwise, you have two choices for dealing with a comment.
To reply to a comment, click the Reply button. Your name appears in the comment box, and you’re offered the opportunity to jot down a counterpoint, rebuttal, or curse.

When the commented issue is no longer an issue, mark the comment as resolved: Click the Resolve button for the comment. The original comment is dimmed, which allows collaborators to still read it. And, if further issues arise, click the Reopen button to continue adding comments.
How to show or hide comments in Word 2019

The markup area (to the right of your text) appears whenever a document features comments. To hide this area, click the Review tab. In the Tracking group, click the Display for Review button, shown in the margin. The four available options set how comments, as well as other document revisions, are displayed:
- Simple Markup: Chose this item to display the markup area and view limited comments and revisions.
- All Markup: Choose this item to display the markup area, where all comments and revisions are shown, along with lines referencing their locations in the text.
- No Markup: Choose this item to hide the markup area. Comments don’t appear, and any revisions are hidden in the text.
- Original: Choose this item to hide the markup area as well as any revisions made to the document. With regard to comments, this item is identical to No Markup.
To view all comments, no matter which document view is chosen, summon the Reviewing pane: On the Review tab, in the Tracking group, click the Reviewing Pane button. Choose either the horizontal or vertical display to summon the Reviewing pane and peruse comments as well as text revisions.
Perusing Microsoft Word comments one at a time
To get an idea of how commenting goes, don’t just randomly scroll through your document trying to find the next gripe or compliment. Instead, use the Next Comment and Previous Comment buttons. These buttons are found on the Review tab, in the Comments group.
Click the Next Comment button to jump to the next comment in the document.

Click the Previous Comment button to jump to the previous comment in the document.
Clicking either the Next Comment or Previous Comment button activates All Markup view.
How to print comments (or not) in Microsoft Word
Yes, it’s horrible, but comments print with your document. This output is probably not what you intended, so follow these steps:- Press Ctrl+P. The Print screen appears.
- Click the Print All Pages button to view its menu.
- Choose the Print Markup command.
This setting controls whether comments, as well as other text markup, print. Remove the check mark to suppress comments on the hard copy.
The Print Preview window confirms whether comments and other markup print.
- Make any other settings in the Print window as needed.
- Click the big Print button to print the document.
You must follow these steps every time you print the document otherwise, the comments print.
How to delete comments in Microsoft Word
Not only is the comment’s issue resolved, but you also don’t want to be reminded of the comment ever again. Work these steps:- Click the Review tab.
- Click the Next Comment or Previous Comment button to locate the offending comment. Upon success, the comment is highlighted in the markup area.
- In the Comments area, choose Delete →Delete.
 The Delete button is one of those menu button icon-things that you must click to access the commands.
 - Repeat Steps 2 and 3 to remove additional comments. Or just keep repeating Step 2 until you find a comment worthy of obliteration.


