- Click the Home tab.
- In the Paragraph group, click the triangle by the Borders button to display the Borders menu.
- Choose the Borders and Shading command.
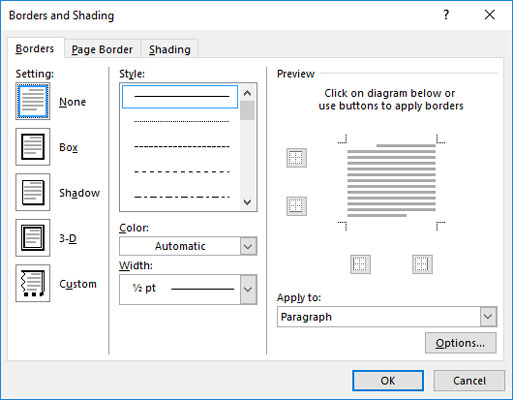
 The Borders and Shading dialog box.
Unlike the Borders menu, additional and custom border-setting options are available in the Borders and Shading dialog box. Most notably, you can set the border line style, thickness, and color.
- The Borders and Shading dialog box also allows you to place a border around a page.
- You can use the commands in the Borders and Shading dialog box to format a table.
Creating a fancy title in Word 2019
To create custom titles for newsletters, documents, or anything else you want to pretend is super important, click to select a paragraph and then go nuts in the Borders and Shading dialog box. You may end up with results similar to what’s shown here. Fancy borders.
To properly apply a special border, follow these general steps in the Borders and Shading dialog box:
- Choose a line style in the Style list. Scroll the list to view the full variety of styles.
- Set the color in the Color list. The Automatic color uses black, or the standard color as set by the document’s theme (usually black).
- Choose a width in the Width list.
- Click in the Preview part of the dialog box to place the line: top, bottom, right, or left.
To start out quickly, select a preset design from the list of icons on the right side of the dialog box.
Click the OK button to apply the customized border to your document’s text.Boxing text in Microsoft Word
The border is primarily a paragraph-level format, though you can also wrap borders around tiny tidbits of text. To do so, follow these steps:- Select the text.
- Summon the Borders and Shading dialog box.
- Set the border style you desire. Only the Box and Shadow options are available, although you can set the color and line thickness.
- Ensure that the Apply To menu shows Text and not Paragraph.
- Click OK.
Applying a page border in Microsoft Word
One gem hidden in the Borders and Shading dialog box is the tool to place a border around an entire page of text. The border sits at the page’s margins and is in addition to any paragraph borders you might apply.Here are the secret directions to set a page border:
- Put the insertion pointer on the page you want to border. For example, you might put it on the first page in the document.
- Summon the Borders and Shading dialog box.
- Click the Page Border tab.
- Set the border style. Choose a preset style, line style, color, thickness
Use the Art drop-down list to choose a funky pattern for the border.
- Click the Apply To menu button to select which pages you want bordered. Choose Whole Document to put borders on every page. To select the first page, choose the This Section – First Page Only item. Other options let you choose other pages and groups, as shown in the drop-down list. And now, the secret:
- Click the Options button. The Border and Shading Options dialog box appears.
- In the Measure From drop-down list, choose the Text option.
The Edge of Page option just doesn't work with most printers. Text does.
To add more “air” between the text and the border, increase the values in the Margin area.
- Click OK.
- Click OK to close the Borders and Shading dialog box.
A page border is a page-level format. If you desire borders to sit on only certain pages, split the document into sections. Use the Apply To drop-down menu (refer to Step 5) to select the current section for the page borders.


