- Go to the bottom-left corner of Discord, click the User Settings gear wheel, and single-click to Voice & Video in the App Settings section. At the top of the window are the input and output settings for your audio.
 Voice & Video grants you audio and video chat, using either the built-in options of your laptop or plug-in accessories you have incorporated.
 - Check the quality of your incoming signal by clicking the Let’s Check button. When looking for the best audio signal, you want to make sure your signal is bouncing within the green of the readout, or the Volume Unit (VU) meter. If you are too loud, the signal will be loud and distorted, or overmodulated.
- Just underneath the VU meter, you should notice that Voice Activity is selected, meaning that audio communications is enabled. Leave Push to Talk unselected. Push to Talk is where you have to use a keyboard shortcut to communicate with others in your chat, like a traditional Citizens Band (CB) radio. Push to Talk is handy if you are hosting interviews or roundtable discussions, but your location is seeing a lot of traffic. Another use is if you are recording an interview or panel discussion, but only in an engineer capacity. Push to Talk silences your audio but allows you to interject if you need to inform the party of any technical issues.
- Video Settings allows you to choose what your video input device will be. Select a camera from the Camera drop-down menu. The Preview window gives you a quick look to assure the signal is good. Underneath Video Settings, Advanced options will help you troubleshoot any problems your audio may encounter.
- Click the Notifications options on the left side of your screen to specify how you wish to be notified when new messages arrive.
If you prefer not to receive notifications on your desktop, make sure the Enable Desktop Notifications option is turned off.
These preferences pertain to your Discord app on a global level. You have the ability to control notifications for specific servers and specific channels.
- Choose an approximate time from the drop-down menu for when you will be away. AFK stands for away from keyboard and is commonly used when users are no longer at their desk or laptops but still online. Text-to-Speech Notifications, when enabled, will read out all or specific notifications.
- If necessary, enable Text-to-Speech for Notifications.
- Scroll down to Sounds to see all the alerts currently enabled. They include
- Message
- Deafen
- Undeafen
- Mute
- Unmute
- Voice Disconnected
- PPT Activate
- PPT Deactivate
- User Join
- User Leave
- User Moved
- Outgoing Ring
- Incoming Ring
- Stream Started
- Stream Stopped
- Viewer Join
- Viewer Leave You can enable notifications and then use these options to decide which notifications you will hear an audible alert. You can control which activity will notify you with an audible alert.
- Click the Activity Feed and search for games that you play in the Search for Games bar. The latest news and links for games you follow appear in your Activity Feed, accessed from the Home option.
- Click Text and Images to review how you want media to appear in Discord posts, and make adjustments if desired. How media is displayed can be customized from channel to channel on your server.
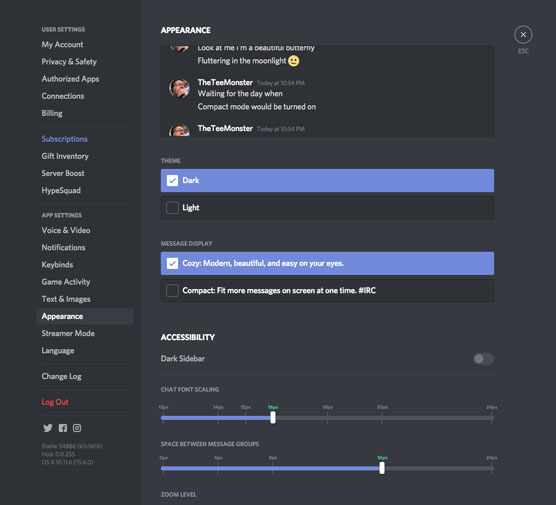
- Click Appearance to customize the look and feel of your Discord. Appearance not only allows you to adjust Discord on an aesthetic level, but also grants accessibility for any users needing assistance on visuals. Play around with the options here to see what works best for you.
 If you prefer your Discord UI to be light or dark, or if you need to change font sizes, Appearance gives you the tools to make your UI perform to your own accessibility needs.
For my developers reading Discord, this is where you — yes, you — can really customize the platform. Under Appearance’s Advanced section, you’ll find Developer Mode, which will help in integration of bots and custom commands with Discord’s application programming interface (API).
Discord’s last two User Settings, Streamer Mode and Language, are quickly covered here. If you want to work in a different language, select your preferred language under the Language option.![]()
Then, at the bottom of the list of options for our User Account options, there is the Change Log option. This option is occasionally offered to you upon launching the Discord app, but it’s easily accessed here. The Change Log is a list of updates and quick fixes to the platform, as well as a look at the continuing efforts from the Discord development team to improve the platform, be it through a new feature, a chance for you to volunteer for a Beta group to test something new, or an opportunity to catch the Discord team at a live appearance. If change is coming to your server, the Change Log where you can read up on it.


