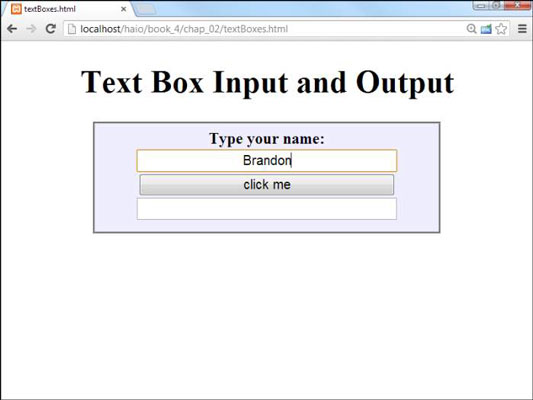
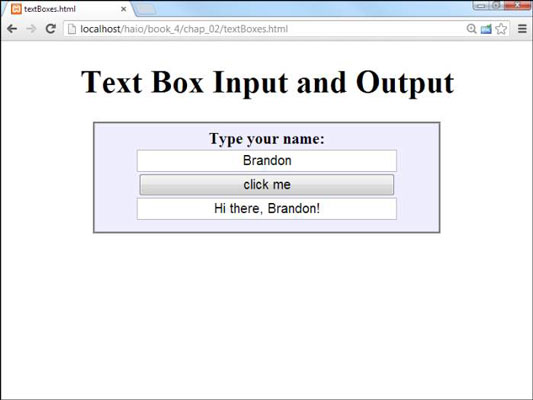
Perhaps the most intriguing application of the DOM in JavaScript is the ability to let the user communicate with the program through the HTML5 web page, without all those annoying dialog boxes. Here is a page with a web form containing two textboxes and a button.

When you click the button, something exciting happens.

Clearly, form-based input and output is preferable to the constant interruption of dialog boxes.
Introducing event-driven programming
Graphic user interfaces usually use a technique called event-driven programming. The idea is simple.
Create a user interface.
In web pages, the user interface is usually built of HTML and CSS.
Identify events the program should respond to.
If you have a button, users will click it. (If you want to guarantee they click it, put the text “Launch the Missiles” on the button.) Buttons almost always have events. Some other elements do, too.
Write a function to respond to each event.
For each event you want to test, write a function that does whatever needs to happen.
Get information from form elements.
Now you're accessing the contents of form elements to get information from the user. You need a mechanism for getting information from a text field and other form elements.
Use form elements for output.
Creating the HTML form
The first step in building a program that can manage text input and output is to create the HTML framework. Here's the HTML code:
<!DOCTYPE html>
<html lang = "en-US">
 <head>
 <meta charset = "UTF-8">
 <title>textBoxes.html</title>
 <script type = "text/javascript">
  // from textBoxes.html
  function sayHi(){
  var txtName = document.getElementById("txtName");
  var txtOutput = document.getElementById("txtOutput");
  var name = txtName.value;
  txtOutput.value = "Hi there, " + name + "!"
  } // end sayHi
 </script>
 <link rel = "stylesheet"
   type = "text/css"
   href = "textBoxes.css" />
 </head>
 <body>
 <h1>Text Box Input and Output</h1>
 <form action = ">
  <fieldset>
  <label>Type your name: </label>
  <input type = "text"
    id = "txtName" />
  <input type = "button"
    value = "click me"
    onclick = "sayHi()"/>
  <input type = "text"
    id = "txtOutput" />
  </fieldset>
 </form>
 </body>
</html>
As you look over the code, note a few important ideas:
The page uses external CSS. The CSS style is nice, but it's not important in the discussion here. It stays safely encapsulated in its own file. Of course, you're welcome to look it over or change it.
Most of the page is a form. All form elements must be inside a form.
A fieldset is used to contain form elements. input elements need to be inside some sort of block-level element, and a fieldset is a natural choice.
There's a text field named txtname. This text field contains the name.
The second element is a button. You don't need to give the button an ID (as it won't be referred to in code), but it does have an onclick() event.
The button's event refers to a (yet undefined) function. In this example, it's named “sayHi()”.
A second textbox contains the greeting. This second textbox is called txtOutput because it's the text field meant for output.
After you set up the HTML page, the function becomes pretty easy to write because you've already identified all the major constructs. You know you need a function called sayHi, and this function reads text from the txt-Name field and writes to the txtOutput field.
Use getElementById to get access to the page
HTML is one thing, and JavaScript is another. You need some way to turn an HTML form element into something JavaScript can read. The magical getElementById() method does exactly that. First, look at the first two lines of the sayHi() function (defined in the header as usual).
  function sayHi(){
  var txtName = document.getElementById("txtName");
  var txtOutput = document.getElementById("txtOutput");
You can extract every element created in your web page by digging through the DOM. In the old days, this approach is how developers used to access form elements. It was ugly and tedious. Modern browsers have the wonderful getElementById() function instead. This beauty searches through the DOM and returns a reference to an object with the requested ID.
A reference is simply an indicator where the specified object is in memory. You can store a reference in a variable. Manipulating this variable manipulates the object it represents. If you want, you can think of it as making the textbox into a variable.
Manipulating the text fields
After you have access to the text fields, you can manipulate the values of these fields with the value property:
  var name = txtName.value;
  txtOutput.value = "Hi there, " + name + "!"
Text fields (and, in fact, all input fields) have a value property. You can read this value as an ordinary string variable. You can also write to this property, and the text field will be updated on the fly.
This code handles the data input and output:
Create a variable for the name.
This is an ordinary string variable.
Copy the value of the textbox into the variable.
Now that you have a variable representing the textbox, you can access its property to get the value typed in by the user.
Create a message for the user.
Use ordinary string concatenation.
Send the message to the output textbox.
You can also write text to the value property, which changes the contents of the text field on the screen.
Text fields always return string values (like prompts do). If you want to pull a numeric value from a text field, you may have to convert it with the parseInt() or parseFloat() functions.


