Resizing web images for display on the iPad and iPhone is important for two reasons: The images must be small enough to display well on a computer monitor and to download quickly to a user’s computer. The smaller the image is, the faster it will download.
Although you can change the display size of an image in a web page by altering the height and width settings in Dreamweaver or any other web editor, you get much better results if you instead change the physical size of the image in an editor program such as Photoshop.
When you alter an image’s height and width in the HTML code, you simply instruct a web browser to display the image in a different size. Unfortunately, browsers don’t do a good job of resizing images because browsers don’t change the image itself, but just force it to fit in the assigned space when the browser loads the page.
If you set the image to display larger than its actual size, the image is likely to look fuzzy or distorted because the image doesn’t contain enough pixels for all the details to look good in a larger size. If you set the code to display the image smaller than it is, the image is likely to look squished and your users must download a larger image than necessary.
Reducing an image’s size for use on the web requires two steps. First, you reduce the resolution of an image, which changes the number of pixels in the image. When you’re working with images for the web, you want to reduce the resolution to 72 pixels per inch (ppi).
Second, you reduce the image’s physical size by reducing its dimensions. You want to size your images to fit well in a browser window and to work within the design of your site.
Follow these steps to lower the resolution and reduce the size of an image in Photoshop (in Photoshop Elements or Fireworks, you follow a similar process although the specific steps may vary):
With an image open in Photoshop, choose Image→Resize.
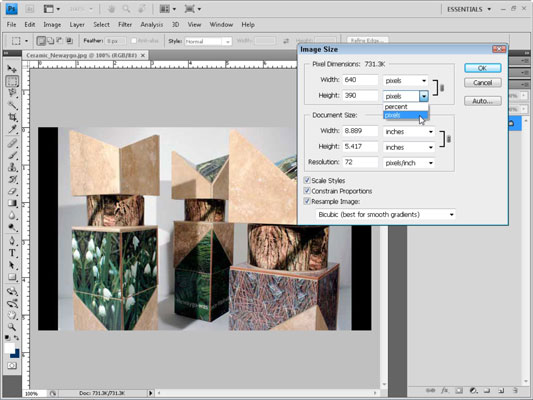
The Image Size dialog box opens.
If you don’t want your original image to lose quality (or you just want to play it safe), make a copy of your image and resize the copy for your website.
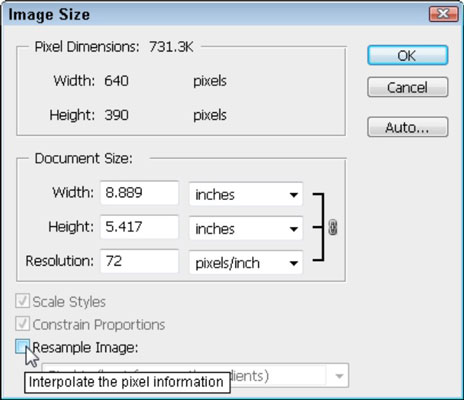
To change the resolution of your image, first deselect the Resample Image check box at the bottom of the Image Size dialog box.

For best results, always deselect the Resample Image check box when you change the resolution. To best prepare images for the web, change the resolution to 72 ppi so that they download faster.
Click and drag to highlight the number in the Resolution field and replace it by typing in the number 72.
The Width and Height dimensions will resize automatically.
Click to select the Resample Image check box.
With the Resample Image check box deselected, you can’t change the Pixel dimensions so it must be checked when you change the image size.
Enter a height and width for the image in the Height and Width fields.

If the Constrain Proportions check box at the bottom of the dialog box is selected (as it is in this example), any changes you make to the height automatically affect the width (and vice versa) to ensure that the image proportions remain constant. If you want to change the image and not maintain the proportions, you can deselect this box.
When you resize an image in Photoshop in the Pixel Dimensions area, you can specify the new size in pixels or as a percentage of the original size.
Images by artists Amy Baur and Brian Boldon, from inplainsight art.
Click OK to resize the image.
If you want to return the image to its previous size, choose Edit→Undo. Beware that when you save the image, the changes become permanent.


